Friday 25 October 2013

Pattern testing - the Paula Pleat Skirt


When Maria Denmark put out a call on Twitter for people to test her new skirt pattern I jumped at the chance! I've made her Kirsten Kimono Tee on no less than 5 occasions and they are in heavy rotation in my wardrobe. I've also got my eye on some others - the Edith shirt dress, Winnie trousers, Audrey knit dress and Laura lounge pants to name a few! I like Maria's simple styles and clear instructions.


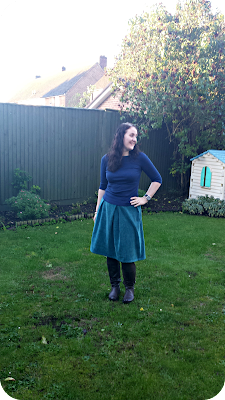
The Paula skirt is a simple pleated skirt with a yoke and invisible side zip. I used a teal corduroy that I bought with a Kelly skirt in mind, but it softened up such when I washed it that I don't think it would have held up well to button plackets . Much better for this pattern! 

Even though I was using a test version that didn't have totally finished instructions it was really easy to put together. (Well apart from sewing the pleats wrong first go, but I seem to have a mental block on pleats so sure that was just me!). The pdf was just 12 pages (none of your 77 page pdfs here - I'm looking at you, Zinnia).

It uses an invisible zip which I was worried about inserting across the seam between yoke and skirt but it went in perfectly (the instructions are for invisible but Maria notes you could use lapped or central zippers). Her use of a waistband facing gives a great clean finish to the zip with no hand sewing.


This is a fab wardrobe basic. You could totally make it in a few hours with just over a metre of fabric and a zip. I think it would be a great first project for a beginner as there's virtually no fitting. Pick the size that fits your waist and you are sorted. There's a mid construction fit check to make sure all is OK before you get onto installing the zip.

It's a great addition to my winter wardrobe and another FESA item ticked off the list! 

Uh-oh...

Photobomb!
 The pattern went on sale today if you want to make your own version and Maria is offering 50% off!

Monday 21 October 2013

More autumn essentials

I made some undies! Ok nothing difficult like a bra (pants/ knickers/vests still on my to do list).


I was chatting on Twitter about the fact that it should be easy to make underskirts, prompted by Carolyn's blog post here. A couple of lovely ladies (no idea who - sorry!) pointed me towards Gertie and Tasia's tutorials. As I had leftover poly satin from my Anna dress lining and my Anise jacket I knew it would be a quick and cheap make and stash bust.

A quick look on Ebay revealed a seller with picot elastic and fold over elastic (for my SoZo pants and vests - I am obsessed with saving postage and often buy stuff ages in advance to avoid paying twice) and it turned out he was just a few miles away from me. I ordered at lunchtime one day and received the next morning! I ordered some pretty lace with a Minerva Fabrics order (see, postage!) and it's gorgeous! It's a lovely weight which makes these feel really luxurious. 


I think the spend on these worked out at £2 per underskirt and they are so much nicer than any bought ones I have had.

I used Gertie's tutorial and it was so fast - both of these were made in an evening.

Perfect for making cotton summer dresses wearable with tights! 

I'll spare you pics of these on me (you're welcome).

Wednesday 16 October 2013

The Other Renfrew


Here's my other version of the Sewaholic Renfrew.  Actually I made this one first before Lizzy suggested the cowl version.

I also got this in Goldhawk Road and it's a more stable jersey with less slipping and sliding and curly edges, so good for a first try at a new pattern!

I went for the round neck since that is my usual t-shirt preference (although I am tempted to trace off the neckline of the Maria Denmark Kirsten Kimono tee and make a slash neck version) and long sleeves.

I really like it - it looks good with my denim Hummingbird skirt (oops, must blog my Hummingbirds!) and fits well with my winter palette.  I can't help but think that a broad shoulder adjustment might get rid of those slight draglines on the shoulder?  I guess as Tasia drafts for a pear shape that perhaps her shoulders are relatively narrow?  Maybe I'll try it on a future version (I'm sure there will be many!).


Total aside - do you like my new boy shoes?  You can't tell from the pic but they are glittery!  N loves them but thinks i should keep them for parties.

Monday 14 October 2013

The Sew-Right-Lizzy Renfrew


Weird pushed back hair so you can actually see the cowl

I'm probably the last sewist in the blogiverse to have made a Renfrew, but why did I wait so long?

I bought the pattern after Me Made May and got the fabric in Goldhawk Road in July with Alison (oops, didn't realise it had been that long!).

This was actually my second Renfrew (first is yet to be photographed - stay tuned!) and after mentioning it on Twitter and hearing that I had a nice drapey viscose knit, Lizzy told me i had to make the cowl version.  I wasn't sure and didn't think i had enough fabric but I decided to give it a go (on the basis that I could always replace it with a neckband since the pattern pieces for the body are the same).  I'm so glad I did as I really like it!

I cut a size 10, and it's actually quite long so I didn't need to lengthen it, surprisingly. To fit it on the fabric I had, I took about 3/4" of the top of the cowl and sewed it together with a 1/4" seam allowance, so it's not far off the size of the pattern.  I also used the 3/4 length sleeves (which I like anyway, especially with the cuffs).

I managed to sew up 2 of these in one weekend so it's a nice quick and gratifying make - will definitely be making more!

Look up there! Honestly it's not another pic of a black t-shirt!


And I owe it all to you Lizzy - you were right! Thanks for the encouragement to make something I usually wouldn't consider!

Am doing pretty well on my FESA list (not so much on keeping up the blogging of it but i'll get there soon!).  Another Renfrew, my bowling dress and a skirt to come soon!

Wednesday 9 October 2013

The Brighton Anna


This is the first completed item from my FESA list!
Prompted as ever by a sewalong (although I ended up not following it as I was too keen to get her finished) and by all the gorgeous versions I have seen popping up everywhere, in particular,  Lizzy's, Roisin's and Fiona's, I wanted to make a winter Anna.  A summer version would be gorgeous but I had pretty much missed the boat on summer makes by the time I got my act together and ordered the pattern!  I went for the midi version with a slash neck - I feel like this could be a better fitting version of the Colette Peony, which I love the shape of but have never worked out my fitting kinks!
I chose a wool blend from Minerva Crafts in french navy and found it really easy to work with - it feels similar to a couple of 1960s vintage dresses I have.  although I did have to use a pressing cloth (as the slightly shiny patch over the back bodice dart will testify). To be able to wear it with tights, I decided to line it, and used a poly satin from Fabricland (previously used this fabric to line my Anise jacket).
As a few bloggers had commented that the bodice was fairly short, I lengthened by 3" as i would usually do.  The waistband sits about 1" above my natural waist but I think this is in line with the design.  My usual small FBA was needed.  I wanted the skirt to hit on the knee rather than midi length as this is more flattering for me, so I left the length as drafted.
I could actually have got this out of 2 metres of fabric, even with my length adjustments so since I bought 3 metres (Minerva only work in whole metres as part of keeping prices down) I have enough left for a skirt hopefully.
After cutting out all the gored skirt panels from lining, I realised that I could have cut the lining as one piece and saved myself all that seaming and finishing, but never mind!  I sewed the darts and pleats down just at the waist to allow for breathing room.
As I didn't plan originally to line it, I failed in avoiding hand sewing - using the Cambie lining tutorial I could have attached the zip to the fabric and lining by machine, but I had sewn up the side seams by this point so too late!  So I slip stitched the lining to the zipper tape by hand.  On a positive note, the invisible zip went in like a dream.
I also hand catch stitched the hem of the dress as I preferred the look.  I tried to finish the lining hem using the rolled hem setting on my overlocker, but the fabric was fraying so badly that the hem was pulling away from the rest of the skirt.  Normal overlocking worked fine.
I really love this dress.  I think it needs a belt, brooch or bright tights to liven it up (went with belt and tights when I wore it the day we took pics) as it's a plain colour but I can tell I will wear it loads this winter.  Can't wait til spring when I can make a few more in summer prints and light fabrics (oh and a maxi version too)!

Friday 4 October 2013

Exciting announcement!

(No, I'm not pregnant! It's far more exciting than that! )


The lovely people at Minerva Crafts have invited me to join their blogger network. This means joining an illustrious group of lovely ladies who are also fantastic sewists. Rachel, Clare, Anna, Kathryn, Winnie, Shivani, Jane and Dibs make such great garments that I'm a bit nervous of putting my sewing up against theirs! 

Hopefully you will like the things I come up with! And of course if you do, you'll be able to buy kits including all the things you'll need to make your own version.  I've had so much fun planning my makes for this.

My first post will be in November which I am very much looking forward to. There are going to be a few other new additions to the Network this time around including the lovely Vicki from Minerva herself and also her mum - can't wait to find out who else!

Wish me luck!